Create a Status Form
Before You Start: Who Creates Forms?
You can create a Status Form if you are:
- A workspace Administrator or Owner
- A Member in the workspace (regular team members)
You cannot create forms if you are:
- A Guest user (limited access)
- Not yet added to the workspace
Typical form creators:
- Team managers creating forms for their direct reports
- Project leaders setting up forms for their project teams
- Department heads organizing cross-functional updates
- Individual contributors starting forms for small working groups
How many forms should you create? Most teams start with one form per team or project. You can always create additional forms later as your needs grow.
Understanding Status Forms
Think of status forms as your team's weekly check-in headquarters. You know how spreadsheets organize data? Status forms work similarly, but they're built specifically for tracking what your team accomplished, what they're tackling next, and where they might need help.
Each form becomes a living record of your team's progress. Week after week, updates pile up in an organized way that actually makes sense. No more digging through scattered emails or trying to remember what someone mentioned in passing three weeks ago.
The beauty lies in the flexibility. Got a sales team? They might need sections for deals closed and pipeline updates. Managing developers? Maybe you want to track code reviews and sprint goals. Whatever your team does, you can shape the form to match how they actually work.
For more detailed information, see About the Status Form.
Creating Your First Form
Ready to get started? Here's how you build a status form:
Step 1: Launch the Creator
Head to the Home page and click the Create a form button. You'll see the Create a status form dialog pop up.
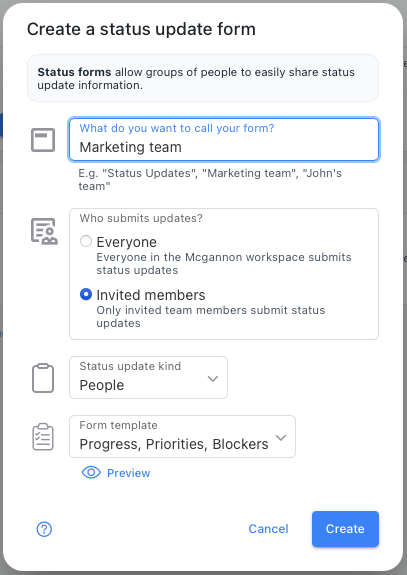
Step 2: Name Your Form and Choose a Template
Naming your form:
Give your form a clear, descriptive name that your team will recognize. Good examples:
- "Marketing Team Weekly Updates"
- "Product Development Status"
- "Q4 Campaign Progress"
- "Engineering Sprint Reports"
Avoid vague names like "Team Form" or "Weekly Updates" – you might create multiple forms over time, and clear names help everyone find the right one.
Choosing a template:
Templates are pre-built starter forms with common sections already set up. Here's how to choose:
- Goals & Achievements: Good for teams focused on specific objectives
- Standard Status: Works for most general team updates
- Project Tracking: Best for teams managing multiple initiatives
- Sales Pipeline: Designed for sales teams tracking deals and targets
- Engineering Sprints: Built for development teams using agile methods
Don't worry about choosing the "perfect" template – you can customize everything later or even switch to a different template. The goal is to get started quickly.
Step 3: Create Your Form
Click the Create button and your form will be generated immediately. You'll be taken to your new form's home page.
What happens next:
- Your form is created but not yet active
- You're automatically set as the form owner
- The form starts with just you as a member
- You can begin customizing before adding team members
Your new form will appear.
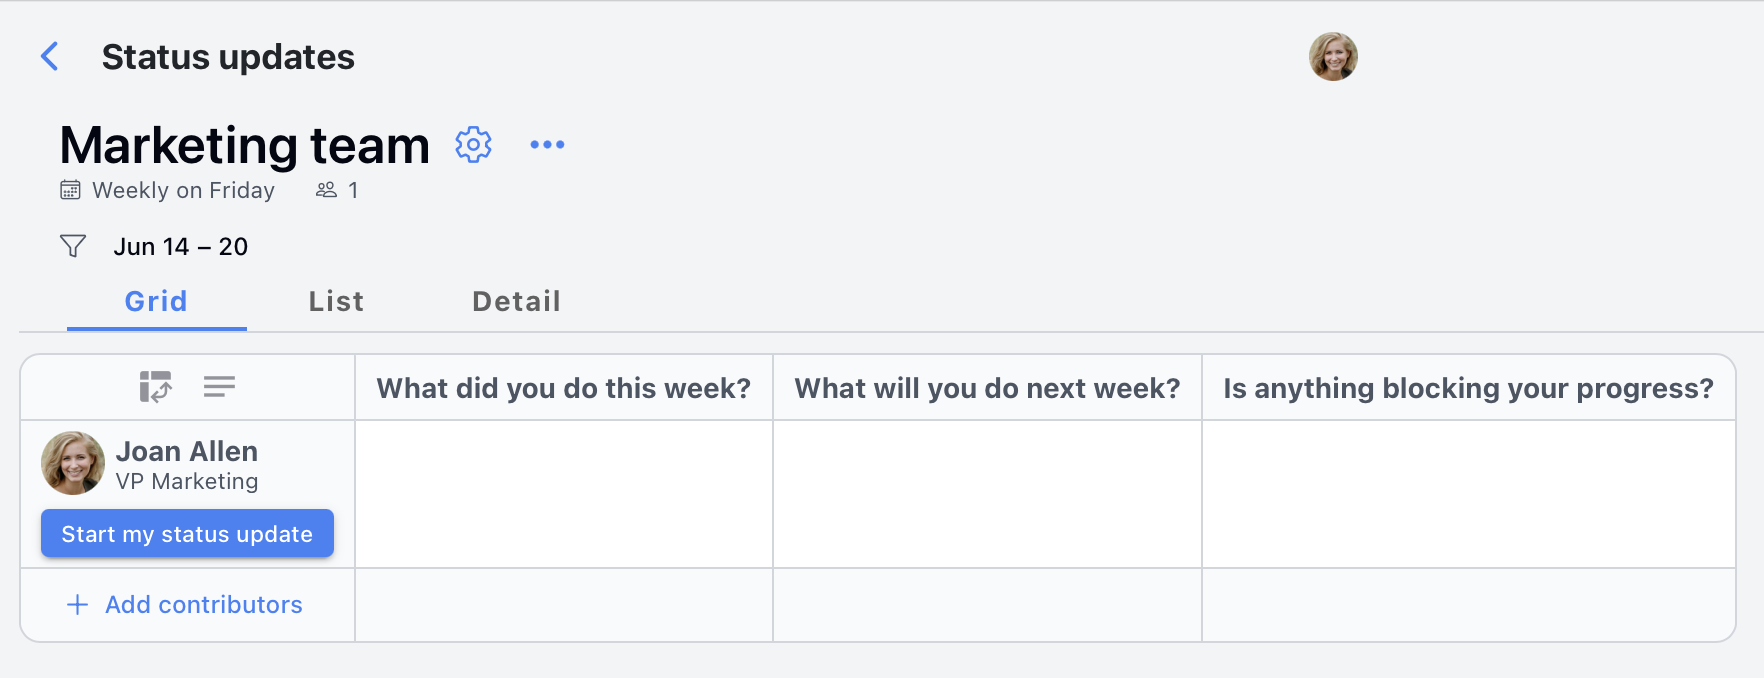
What You're Looking At
Your brand-new form might look a bit sparse right now, but here's what you've got:
The Top Row houses your input sections. These are the questions everyone will answer each week – stuff like "What did you accomplish?" or "What's blocking you?" Think of them as conversation starters that keep everyone on the same page.
The Left Column shows who's part of your form. Right now, that's just you (the creator), sitting pretty in the first row. As you add teammates, each person gets their own row in this column.
The Grid is where the magic happens. When someone submits their weekly update, their answers pop up in their row under the right sections. Over time, you'll see patterns emerge and get a real feel for how your team operates.
It's like having a customizable spreadsheet that actually understands how teams work. Each person owns their row, and every week adds another chapter to your team's story.
Your Post-Creation Checklist
Now that you've created your form, here's what to do next to make it effective:
1. Test Your Form First
Before adding team members, submit a test update yourself:
- Click "Start my status update"
- Fill out each section as if you were a team member
- Check if the sections make sense and are easy to understand
- Make note of any confusing wording or missing information
2. Customize Your Sections (If Needed)
Based on your test, you might want to:
- Customize the form to better match your team's language
- Add sections that are missing for your specific needs
- Remove sections that don't apply to your team
- Reorder sections in a logical flow
3. Set Up Your Schedule
Decide when your team will submit updates:
- Most common: Friday submissions, Monday morning reports
- Alternative: End of sprint for development teams
- Monthly: For higher-level strategic updates
- Configure reminder timing in form settings
4. Add Your Team Members
Once you're happy with the form:
- Add team members one by one or in bulk
- Assign appropriate roles (Contributor, Viewer, etc.)
- Send personalized invitations explaining the purpose
- Consider starting with a small group before expanding
5. Communicate the Purpose
Before launching, make sure your team understands:
- Why you're using this form (replace meetings, improve communication, etc.)
- When they'll receive reminders and when updates are due
- What level of detail you're looking for in updates
- How this will benefit them (better visibility, less meeting time, etc.)
Common Mistakes to Avoid
Form Design Mistakes
- Too many sections: Start with 3-4 sections maximum
- Vague section names: "Other" or "Miscellaneous" sections are rarely useful
- Corporate jargon: Use your team's natural language
- Overly complex: Keep it simple enough for busy team members
Team Management Mistakes
- Surprise launches: Always communicate the purpose and timeline first
- Adding everyone at once: Start small and expand gradually
- No clear expectations: Be specific about what you want in updates
- Forgetting to model behavior: Submit your own updates consistently
Timeline Mistakes
- Unrealistic deadlines: Give people enough time to submit thoughtful updates
- Poor reminder timing: Friday afternoon reminders often get missed
- No grace period: Allow a day or two for late submissions
- Inconsistent schedule: Stick to your chosen rhythm
Troubleshooting Form Creation
"I don't see the Create a form button"
- Check your role: Only Members, Admins, and Owners can create forms
- Verify workspace access: Make sure you're properly added to the workspace
- Contact your administrator: They may need to adjust your permissions
"I can't choose a template"
- Templates not loading: Try refreshing the page or using a different browser
- Limited template access: Some organizations restrict certain templates
- Skip template selection: You can create a blank form and add sections manually
"My form looks empty after creation"
- This is normal: New forms start with just basic structure
- Add content gradually: Customize sections, then add team members
- Preview functionality: Submit a test update to see how it will look with content
"I made a mistake in the form name"
- You can change it: Go to form settings to update the name
- Consider team impact: If others are already using the form, communicate the change
- URL doesn't change: The form's web address stays the same even if you rename it
Understanding Form Permissions
As the Form Creator, You Can:
- Edit all form settings and sections
- Add/remove team members
- View all submitted updates
- Export form data
- Transfer ownership to someone else
- Delete the form (carefully!)
Your Team Members Can:
- Submit their own status updates
- View other team members' updates (unless restricted)
- Comment on updates (if commenting is enabled)
- Edit their own submissions (within time limits you set)
What You Cannot Do:
- Force people to submit updates (it's based on trust and team culture)
- See updates from other forms unless you're specifically added to them
- Restore deleted forms (deletions are permanent)
Next Steps After Creating Your Form
Immediate Actions (Do These Today)
- Test the form by submitting your own status update
- Customize sections if the template doesn't quite fit
- Write a brief explanation of what you want in each section
This Week
- Add your core team members (start with 2-3 people)
- Send personal invitations explaining the purpose and timeline
- Set your reminder schedule in form settings
- Submit your first real update to model the behavior
Ongoing Management
- Monitor participation and follow up with non-participants
- Adjust sections based on what's actually useful
- Review and improve based on team feedback
- Celebrate successes when the form helps solve communication problems
Remember: The goal isn't perfection from day one. Start simple, learn what works for your team, and iterate based on real usage.
Related Resources
Ready to dive deeper? Here are the most helpful next steps:
- Form Customization - Learn how to modify sections and layout to fit your team
- Form Sharing - Step-by-step guide to adding team members and setting permissions
- Templates Overview - Explore all available templates and when to use them
- Form Settings - Advanced configuration options for schedules, reminders, and more
- Form About - Complete guide to understanding how Status Forms work